Setup Page
Overview
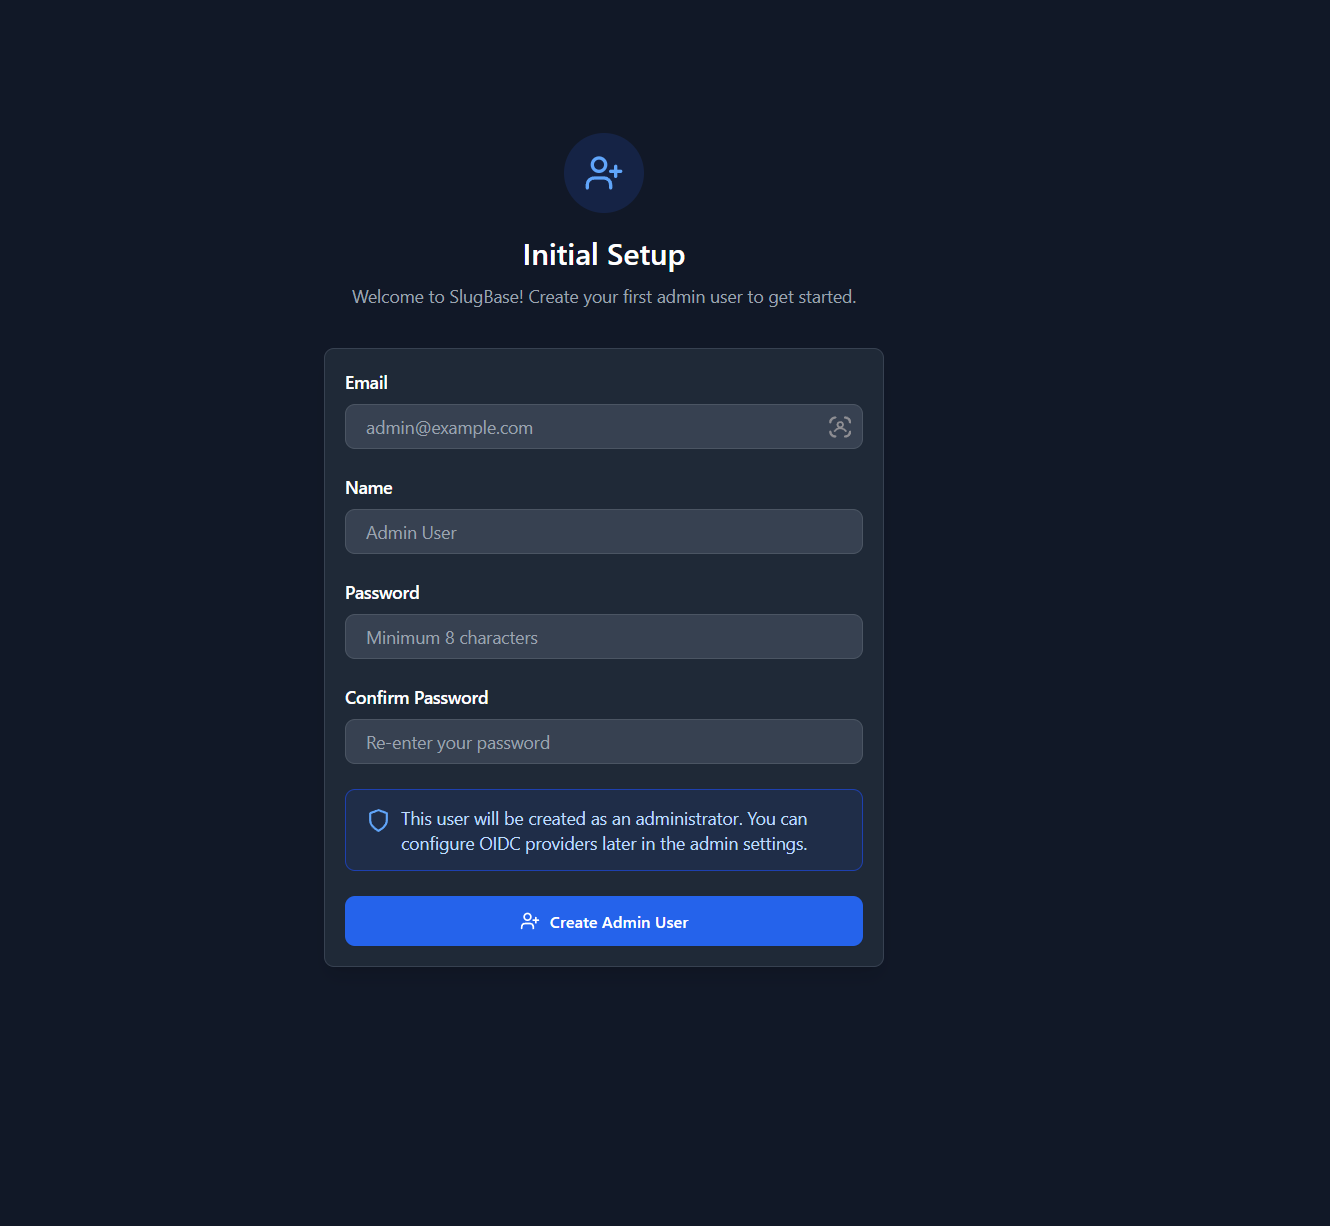
The Setup page is the initial configuration page displayed when SlugBase is first installed and no users exist in the system. It allows creating the first admin user, which then enables the rest of the application functionality. After setup is completed, this page becomes permanently inaccessible.
Route
- Path:
/setup - Authentication: Not required (public access)
- Availability: Only accessible when system is not initialized
- Auto-redirect: Initialized systems redirect away from setup page
Features
Initial Admin User Creation
- Admin Creation: First user automatically becomes administrator
- Required Fields: Email, name, and password
- Password Validation: Minimum 8 characters
- Password Confirmation: Must match password field
- Form Validation: Client-side and server-side validation
Setup Flow
- Check Initialization Status: System checks if users exist
- Display Setup Form: If not initialized, show setup form
- Create Admin User: Submit creates first user with admin privileges
- Success State: Shows success message and redirects to login
- System Lock: Setup page permanently disabled after first user creation
Form Fields
-
Email (required)
- Email format validation
- Must be unique (system-wide)
- Placeholder: "admin@example.com"
-
Name (required)
- User's display name
- Placeholder: "Admin User"
-
Password (required)
- Minimum 8 characters
- Secure password input (hidden)
- Placeholder: "Minimum 8 characters"
-
Confirm Password (required)
- Must match password
- Client-side validation
- Placeholder: "Re-enter your password"
User Interface
Layout
- Centered Form: Clean, centered setup form
- Card Design: White/dark card with rounded corners and shadow
- Hero Section: Icon, title, and description
- Admin Notice: Informational banner about admin privileges
- Success State: Success message with redirect notice
Visual Elements
- Header Icon: UserPlus icon in blue circle
- Title: "Initial Setup"
- Description: Welcome message and instructions
- Admin Notice: Blue info box explaining admin privileges
- Form Fields: Labeled input fields with validation
- Submit Button: Primary action button
Success State
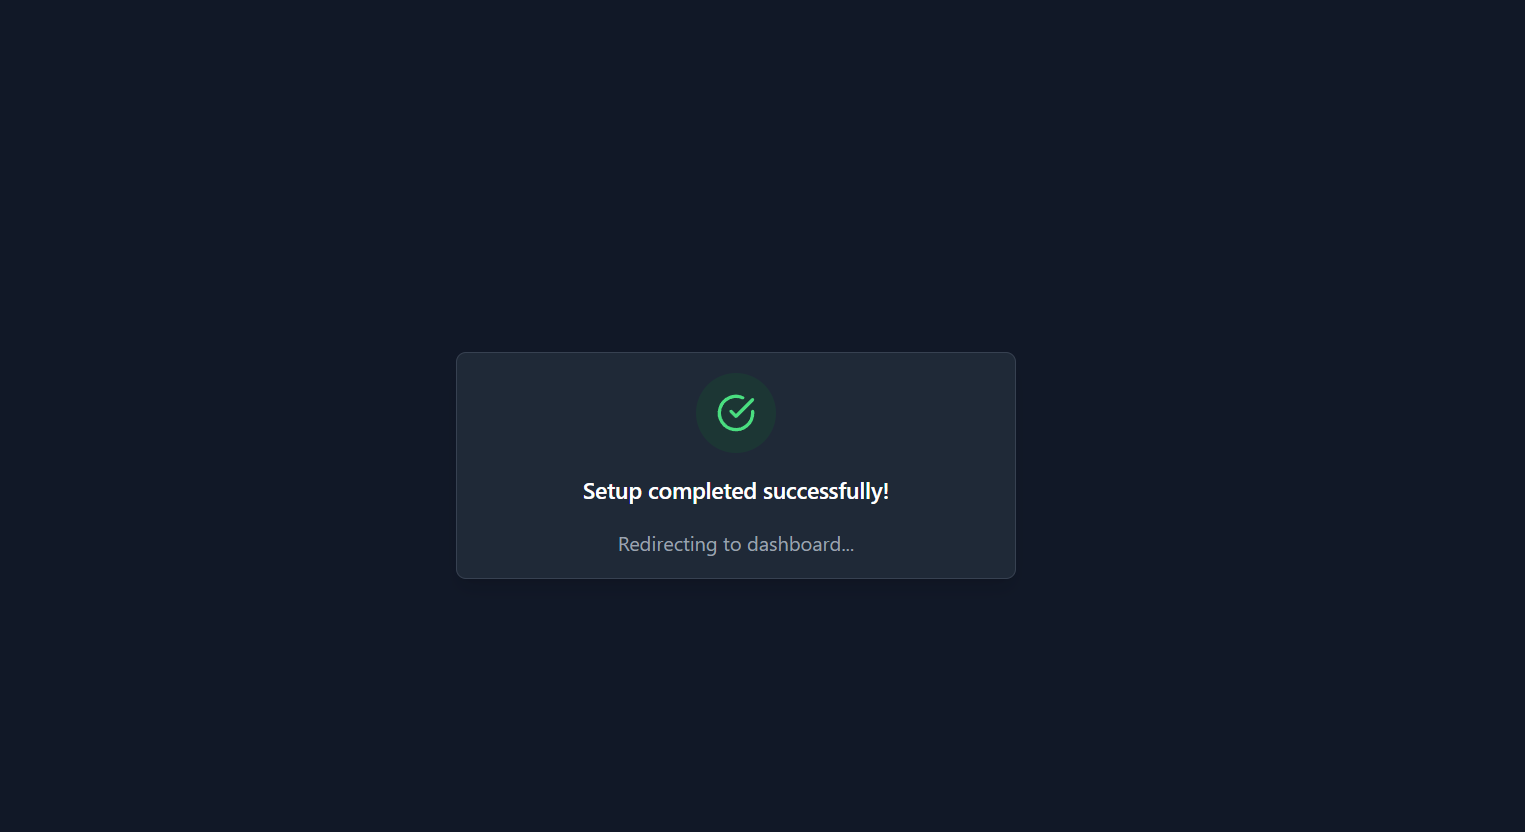
After successful setup:
- Success Icon: CheckCircle icon in green circle
- Success Message: "Setup completed successfully!"
- Redirect Notice: "Redirecting to login..."
- Auto-redirect: Automatic redirect to login page after 2 seconds
User Interactions
Completing Setup
- Navigate to application (if not initialized, automatically shown setup)
- Fill in email address
- Fill in name
- Enter password (minimum 8 characters)
- Confirm password (must match)
- Review admin notice
- Click "Create Admin User" button
- Wait for success message
- Automatically redirected to login page
Form Validation
- Real-time Validation: Client-side validation on blur
- Submit Validation: Server-side validation on submit
- Error Messages: Clear, specific error messages
- Field Highlighting: Error states highlight problematic fields
Component Structure
<Setup>
  <Container>
    <Header>
      <Icon>
      <Title>
      <Description>
    </Header>
    {success ? (
      <Success State>
        <Icon>
        <Message>
        <Redirect Notice>
      </Success>
    ) : (
      <Setup Card>
        <Form>
          <Email Input>
          <Name Input>
          <Password Input>
          <Confirm Password Input>
          <Admin Notice>
          <Error Display>
          <Submit Button>
        </Form>
      </Card>
    )}
  </Container>
</Setup>
API Integration
GET /auth/setup/status- Check if system is initializedPOST /auth/setup- Create first admin user
Setup Endpoint
POST /auth/setup
- Body:
{ email, name, password } - Response: Success or error
- Side Effect: Creates first user with
is_admin: true - System State: Marks system as initialized
Security Considerations
Password Security
- Minimum Length: 8 characters required
- Password Hashing: Passwords hashed with bcrypt
- No Plaintext Storage: Passwords never stored in plain text
- Secure Transmission: HTTPS recommended in production
Setup Protection
- One-Time Setup: Setup only works once
- Permanent Lock: After first user, setup permanently disabled
- Admin Creation: First user always becomes admin
- No Bypass: No way to re-enable setup after initialization
Validation
- Email Uniqueness: Server validates unique email
- Password Strength: Minimum length enforcement
- Input Sanitization: Server-side validation
- Error Messages: Generic errors prevent enumeration
Error Handling
Validation Errors
- Password Mismatch: "Passwords do not match"
- Password Too Short: "Password must be at least 8 characters long"
- Email Format: Email format validation
- Server Errors: Generic error message on failure
Network Errors
- Connection Issues: Connection error messages
- Timeout Handling: Request timeout handling
- Retry Logic: User can retry submission
State Management
Form State
- Form Data:
{ email, name, password, confirmPassword } - Loading: Button disabled during submission
- Error: Error message state
- Success: Success state triggers redirect
Initialization Check
- Setup Status: Fetched on mount
- Auto-redirect: Redirects if already initialized
- Loading State: Shows loading while checking
Styling
- Clean Design: Professional, welcoming interface
- Dark Mode: Full dark/light mode support
- Responsive: Mobile-friendly layout
- Visual Hierarchy: Clear information architecture
- Success Feedback: Clear success indicators
Related Components
Button- Styled button component- Form inputs - Standard HTML inputs with styling
Related Pages
Technical Details
- Component File:
frontend/src/pages/Setup.tsx - State Management: React hooks (
useState) - Routing: React Router (conditional rendering)
- API Client: Custom API client
- Validation: Client-side and server-side
i18n Keys Used
setup.*- All setup-related stringscommon.loading- Loading state textcommon.error- Error messages
Initialization Flow
- App Start: Check setup status
- Not Initialized: Show setup page
- Initialized: Show login page
- After Setup: Redirect to login
- System Lock: Setup never accessible again
Admin Notice
The setup form includes a prominent notice explaining:
- First user becomes administrator
- OIDC providers can be configured later
- Admin panel accessible after login
- Important for security awareness
Best Practices
- Secure Password: Use strong password for admin account
- Valid Email: Use real email for password recovery
- Documentation: Note admin credentials securely
- OIDC Setup: Configure OIDC providers after setup
- Backup: Consider backing up admin account details
User Experience
- Clear Instructions: Obvious what to do
- Validation Feedback: Immediate validation feedback
- Success Confirmation: Clear success state
- Auto-redirect: Seamless transition to login
- Professional Design: Builds confidence in application
Accessibility
- Proper form labels
- Keyboard navigation
- Screen reader support
- Focus management
- ARIA attributes